SitecorePatched The post is related to the image resize vulnerability fix introduced in Sitecore 7.5. To read more about the Sitecore fix go to the Release notes page and search for ?Media request protection?. While I was holding off for a number of months on the publication of the post as it puts the attack vector in plainer sight that I would like it to be (while the community figured out how to work with Media Resizing in a neat way) – but recently I’ve seen voices raised considering turning the Media Request protection off which I hope you will not be doing after reading this post. The post will also tell you how to enable such security on your older versions of Sitecore.

So here’s the story…. At some point in Cognifide we have performed a research around Sitecore security and one of my colleagues (Marek)  found out that you could easily kill any Sitecore instance by performing an image resize attack on it. While the CMS did some rudimentary checks and limited the values of height and width you could still perform an attack by harvesting the images from the site and perform multiple parallel & iterative size increase or just plain use the scale parameter to achieve any image size. A result of such attack would be a a denial of service due to 100% CPU & memory usage and would potentially allow for filling the server drive by creating the endless number of scaling calls.

Marek was even kind enough to provide a proof of concept code that confirmed the hypothesis by performing attack on a few of our internal servers. The program would load the home page; parse to find images linked from it and perform resizing of the images in a number threads.

Psst? Mike made me add the image ? supposedly without it I?m not as cool as Stephen!

Following the discovery I’ve attempted to remedy the problem and as a consequence came up with the solution which I have recently put on GitHub – ImageGuard which signs the rendered media links that use any of the resizing/scaling capabilities and filters all request that try to resize/scale, allowing the sizing only when the hash matches and provided it to Sitecore.

This solution is nowhere as complete as the one that was later provided by Sitecore – starting from version 7.5 ? still I think it?s still worth making it public to allows for older versions of Sitecore to be guarded against this type of attacks. Read the rest of this article »

join_the_puzzle_crowd_400_clr_10889Since we’ve seen some interest from developers wanting to join the Sitecore PowerShell Extensions team, I thought it might be worth documenting how my development environment is put together to allow for easier on-boarding of new members (Yes, we’re hiring! No, we can’t pay you ;) ). Maybe you just want to compile it yourself to make sure we’re not up to no good, or just plain see inside and play with it…

First of all you need to have Sitecore installed somewhere (obviously). For the purpose of examples I’ll assume your instance is located at C:\inetpub\wwwroot\Sitecore8\ and has the 3 standard folders Data, Databases and Website in them as it normally has. For that very same reason I’ll also assume that your Sitecore PowerShell Extensions project folder is located at C:\Projects\SitecorePowerShell\

1) Seed your Sitecore instance

First step that I always perform when I setup a new environment is to seed the Sitecore instance with the items required which is best done by installing the latest release of PowerShell Extensions.

2) Set up Sitecore SPE folders to use the latest files you’re working on

Since we’re likely to modify the assets like JavaScript, styles or XML Controls I want those to be automatically synchronized with changes I do in C:\Projects\SitecorePowerShell\ for this purpose I set up junction points in my Sitecore instance folder to point at my repository folder. To do this I delete the folders that were created by the install package and perform the Junction creation. Assuming the folders as they were specified before you can write a short batch file that would look like this: Read the rest of this article »

It?s been a while since my last summary on April 2012 but finally getting to update the Reference page with the latest community summary for Sitecore PowerShell Extensions.

book_open_light_shine_out_800_clr_9090

Following are the updates I will be pushing onto the reference page I?m trying to keep up to date and failing miserably most of the time. Read the rest of this article »

Sitecore PowerShell Extensions 3.0 Modules

brown_cardboard_box_light_800_clr_4510

A large problem with Sitecore PowerShell Extensions up to version 3.0 was the lack of proper separation of solutions provided on top of it from the core of the module. The problem is that all integrations look for scripts in the main Script Library but they look for them solely in their single libraries. The specification outlined in this blog aims at solving this issue. Read the rest of this article »

Sitecore PowerShell Extensions Persistent Sessions

coach_time_out_400_clr_4749 If you?re reading this, chances are you?ve probably read about the ways of putting scripts in the Content Editor ribbon or Context Menu. Those are some simple and quick ways of extending the Sitecore UI to do quick actions accessible for your users without them having to even know about the existence of PowerShell in your system. Up until now however we?ve not been very vocal about the fact that those does not really have to be quick one-off actions but they can indeed form a broader solution to your problem through the use of persistent, named sessions. In fact Sitecore PowerShell Extensions (SPE) allow you to manage sessions and decide that it should stay in memory after the script have executed. In fact SPE does quite a bit of session maintenance itself that you might want to be aware of.

What do I really need to know about script sessions?

ScriptSession is an object that encapsulates a PowerShell Runspace. Whenever you decide to run a script 2 things will happen:

  • a ScriptSession is requested from the SessionManager (which either creates a new session or recovers an existing named session)
  • after which it?s being used to execute your script in either the current thread or a new Sitecore Job is being instantiated and the Script session is passed to it for execution.

This is decided internally based on what you?re using a Session for unless you?re instantiating it directly (like described in this post) in which case you?re responsible for disposing it.

After the script is executed and the Job has ended the session is discarded unless your script has a Persistent Session ID which I will show you how to define in just a moment.

Great so there are sessions? but what are they good for?

Read the rest of this article »

Working with Sitecore items in PowerShell Extensions

Reading some of the blogs from the Sitecore community I find it pretty apparent that we didn?t do a great job advocating the optimizations that PowerShell Extensions have introduced for working with Sitecore items. This blog attempts to rectify this problem to a degree.

group_construction_workers_400_clr_8597

How do I retrieve my Sitecore items the PowerShell way?

The most natural way to retrieve Sitecore items is with use of Get-Item and Get-ChildItem commandlets. That is because those 2 commandlets add a PowerShell wrapping around them that allows the functionalities that I?m going to describe in the next section of this blog after I?ll tell you all about retrieving items.

If you have retrieved your item directly using the Sitecore API you can still add the nice wrapper when you pipe them through the Wrap-Item commandlet as well. Some of those enhancements work in the older versions of PowerShell Extensions but I would encourage you to upgrade to the latest version (2.7 at the time this blog was written) to leverage the full potential of the environment.

Read the rest of this article »

Posted in Best Practices, Code Samples, PowerShell, Sitecore, Software Development, Solution, Web applications
1 Star2 Stars3 Stars4 Stars5 Stars (3 votes, average: 5.00 out of 5)
Loading...
| 165 Comments »

Sitecore PowerShell Extensions Remoting

hand_controlling_puppet_figure_400_clr_14285I?ve been meaning to write this article for quite a while since the functionality to remote into the Sitecore environment exists in the module at least for at least a couple of versions now and the recent email from one of the Sitecore PowerShell Extensions users convinced me this cannot wait any longer.

When would I remote into my Sitecore instance?

You would probably need this as part of your Continuous Integration or installation scripts. If you need to manipulate Sitecore data from your deployment script remoting is the right solution for you.

How is that special?

We have a a number of web services that could somewhat achieve this functionality for even longer but I didn?t consider those sufficient since a real remoting functionality cannot be limited to just passing text results from the scripts passed but rather should enable the script writers to achieve true interactions between scripts running locally and the scripts that are being executed on the server.

To enable remoting on your Sitecore instance you don?t really have to do anything the web services are already deployed when you install Sitecore PowerShell Extensions. On your local machine all you need to do is include the commandlets in the script that you can find at the following path in your Sitecore instance if you’re using SPE versions older than 2.8:

master:/system/Modules/PowerShell/Script Library/Functions/Remoting

or here in 2.8 and newer:

master:/system/Modules/PowerShell/Script Library/Platform/Functions/Remoting

When you execute the script You will get 4 new commandlets at your disposal:

Read the rest of this article »

Sitecore PowerShell Console in Visual Studio

A while ago Jakob suggested that putting the Sitecore PowerShell Console in Visual Studio might not be a bad idea. He even provided me with the boilerplate code that served as a stub for the module (Thanks a million Jakob!).

So after some struggling on my part the new module is now on the Sitecore Marketplace. There is really not much to write about. If you like PowerShell and Sitecore Rocks you will find it pretty neat. Otherwise I?m afraid those are not the droids you are looking for Uśmiech

Basically what it does is: it allows you to enjoy PowerShell automation while still skipping the web interface (that effectively is why you?re using rocks, right?).

Pre-Requisites are:

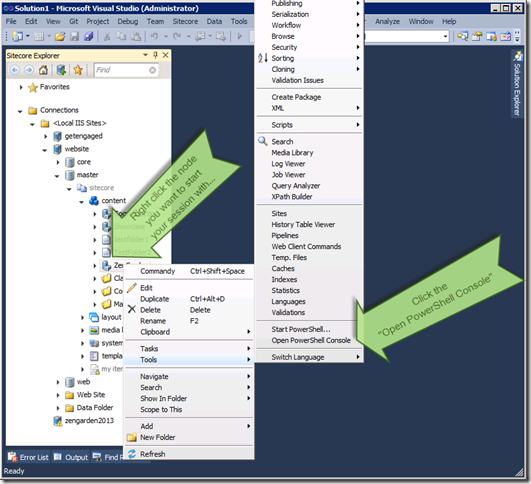
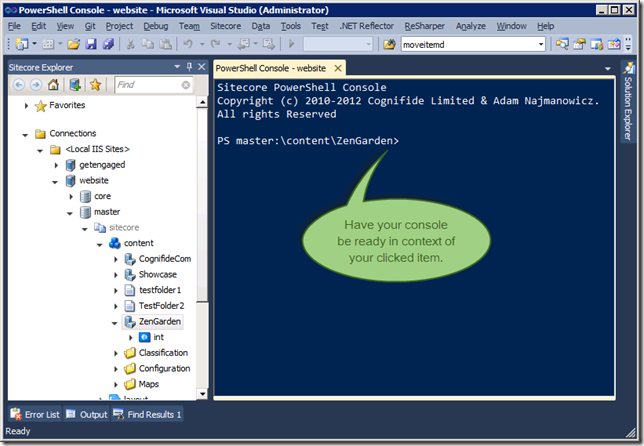
Installation is fairly straightforward. Once you download the zip file ? unpack it somewhere on your drive and run the install.bat within it. Once you restart your Visual Studio you?ll be able to do the following:

OpenRocksConsole 

Which should result in the following outcome:

RocksConsoleOpened

Feel free to contact me or post your questions as a comment below.

PS_detectiveRecently I?ve been asked to audit a site for one of our clients. Overall for a fairly seasoned Sitecore developer it?s rather obvious what to look for in a site and get a feel for whether an a solution is thoroughly thought through or just put together using brute-force development. You can usually tell if the implementation is sloppy or excellent, but how do you quantify that feeling to give the objective view to the person reading your report? Looking at the Sitecore Developer Network I?ve found the following set of recommendations. This is a great help with codifying how a proper Sitecore implementation should look like, what should we pay attention to and most importantly it?s a great reference when you?re trying to prove that your feeling is something more than just nitpicking but rather an industry standard that the developers should adhere to. I recommend strongly that you look at it and think how closely your practices match those that Sitecore recommends.

There is a small problem though. Not all of them are easy to asses, at least not without some clever tools in your toolbox. for example what do I do with a statement like:

Use TreelistEx instead of Treelist when showing very big trees ? like the Home node and its descendants ? or have lots of Treelist fields in one single item. TreelistEx only computes the tree when you click Edit whereas a Treelist will compute it every time it is rendered.

It might be fine in a small site to verify in a few data templates that it?s not violated, but  In my case I was dealing with a multisite platform that can potentially host tens or even hundreds of sites? Going manually over the hundreds of fields in nearly 300 data templates, bah even finding them ? would not be fun or easy thing to do. But hey? we have PowerShell why should I look there if I can whip up a one liner for it? Let?s try it then.

Read the rest of this article »

Posted in Best Practices, C#, CMS UX, PowerShell, Sitecore, Software Development, Solution, Uncategorized
1 Star2 Stars3 Stars4 Stars5 Stars (3 votes, average: 5.00 out of 5)
Loading...
| 58 Comments »

Continuous deployment in Sitecore with PowerShell

A few days back a budy from our Sitecore team has alerted me to this interesting question on StackOverflow which asks for automation of content promotion from one Sitecore instance to another. He suggested – and rightly so ? that the PowerShell Console could be used in that scenario. While this was always possible by simply writing it as a PowerShell code the latest version of the console added a few commandlets making building packages much easier.

The easiest approach is to build the package visually in the package designer, save it and then simply use the console to read it and generate the installation zip like:

get-package "powershell console.xml" `
  | Export-Package -FileName "PowerShell Console.zip" -Zip

That?s fine in most cases but if you have some more complex scenarios or want to generate some custom packages ? you might want to generate packages directly in PowerShell.

To Create a Package you simply use:

$package = new-package "Test Package";

Now that you have that package you might want to add some files and items to it.

Let’s add for example our item templates by querying the master database and creating a dynamic item source:

$TemplatesSource = get-childitem "master:/templates/Cognifide" `
  | New-ItemSource "Cognifide Templates";

And subsequently add it to our new package:

$package.Sources.Add($TemplatesSource);

While that by itself is fairly useful, the really cool part is that you have a full flexibility of PowerShell at your disposal when you create a source with static items. Let?s say you want to add all items of template ?Article Template? that reside anywhere under your ?home? node ? now that would require quite a bit of clicking in the Package Designer, but is trivial with the PowerShell Console:

$ArticlesSource = get-childitem master:/content/home/about-us/* -recurse `
  | where-object { $_.TemplateName -match "ArticleTemplate" } `
  | New-ExplicitItemSource "Cognifide Articles";

$package.Sources.Add($ArticlesSource);

You can specify any automation or filter you can think of to your Get-ChildItem, and you really don?t have to skimp on the number of data sources ? after all you can re-generate your package at any time!

Similarly you can do this to the files on disk. Let?s say ? you want to add all .aspx, .ascx and .ashx files, just to make sure your deployment features all the latest code and for the sake of this example let?s assume your UI elements are located in the Layouts folder under your web application:

$LayoutsPath = $AppPath+"layouts\*"
$Layouts = get-childitem $LayoutsPath -include "*.as?x" -recurse -force `
  | New-ExplicitFileSource "My Layouts";
$package.Sources.Add($Layouts);

Easy enough? now let?s add everything that is within the bin folder as a dynamic file source:

$BinFolder = New-FileSource "Bin Folder" -Root "/bin"
$package.Sources.Add($BinFolder);

That is it really? you may want to specify your package metadata which you would do like:

$package.Metadata.Author = "Auto generated " + `
  [DateTime]::Now.ToShortDateString();
$package.Metadata.Comment = "Isn't it cool?!";
$package.Metadata.Publisher = "Cognifide";

and then save it for later opening in package designer:

$package | Export-Package -FileName "test package.xml"

alternatively you can open such package as specified earlier

get-package "test package.xml"

if you ever wanted to add more sources to it or export as a zip file to be imported with the assets in your target environment:

$package | Export-Package -FileName "test package.zip" -Zip

? now on your target machine you need to upload your package to the Data\Packages folder. But then to install it all it takes is:

Import-Package "test package.zip"

Obviously all of it can be hooked to ribbon, context items, or be scheduled? but I get ahead of myself…

So how does it all relate to continuous deployment?

All of this can be completely automated, all you need to do is create a Script item as described in one of my previous posts and call the PowerShell execution URL referencing your script from your CruiseControl server or whichever continuous integration product you use in a fashion similar to:

http://myhost/Console/Layouts/PowerShellResults.aspx?scriptId={1680E211-BD28-49BE-82FB-DA7232814C62}&scriptDb=web

You need to deal with the fact that you are most probably not logged in with your continuous delivery environment ? in this case probably best approach is to use the web database or the script item my turn out to be unavailable to you and the script will not execute.

Now in your source environment your script will create the package and upload it to an FTP server (there is plenty of ways to do this from PowerShell? you can find a couple of samples on Stack Overflow) and subsequently call a second part of the script on the target server.

On the Target server ? a complementary script will be executed in the similar fashion ? by the originating server and if you don?t have direct access to the file on the FTP server you?ve just uploaded ? you can download it and import the package.

Now if you integrate the script with a ribbon in Content Editor on the source server (like described in the previous post) you can have a one-click-deployment solution on your dev machine, but then the REALLY cool part would be to integrate it with the context menu (as described in this post) and be able to push parts of the site to production with a single click! Not to mention your nightlies can really be nightlies if you do it using the scheduled tasks integration.